Affiliate Links: This post may contain affiliate links. Meaning I may get a small commission, at no cost to you, if you decide to make a purchase through my link. Please read my DISCLOSURE for more information.
The Helix line of fish finders (flashers) are powerful, multi-purpose tools that really shine when put on ice. I’ve been using the Humminbird Helix 5 Chirp SI G2 on my kayak for years but this is the first season I’ve put it to use for ice fishing. I can’t believe I’ve waited so long to use my Helix on the hardwater, it’s hands down the best flasher unit I’ve used while ice fishing. You may be asking what held me back? Well, I have an old Lowrance portable fish finder that works just fine, so why fix what isn’t broken, right? It’s too bad I didn’t make the switch earlier, the Helix is an even better ice unit than it is open water and now I feel like I’ve been missing out!
So, what makes the Humminbird Ice Helix the best ice fishing flasher on the market? Read on to find out.
Dedicated Ice fishing features:
When you first turn on your Helix, the first thing you need to do is switch it from open water mode to ice mode. Ice mode opens up a host of features not available in open water mode.

Flasher Mode
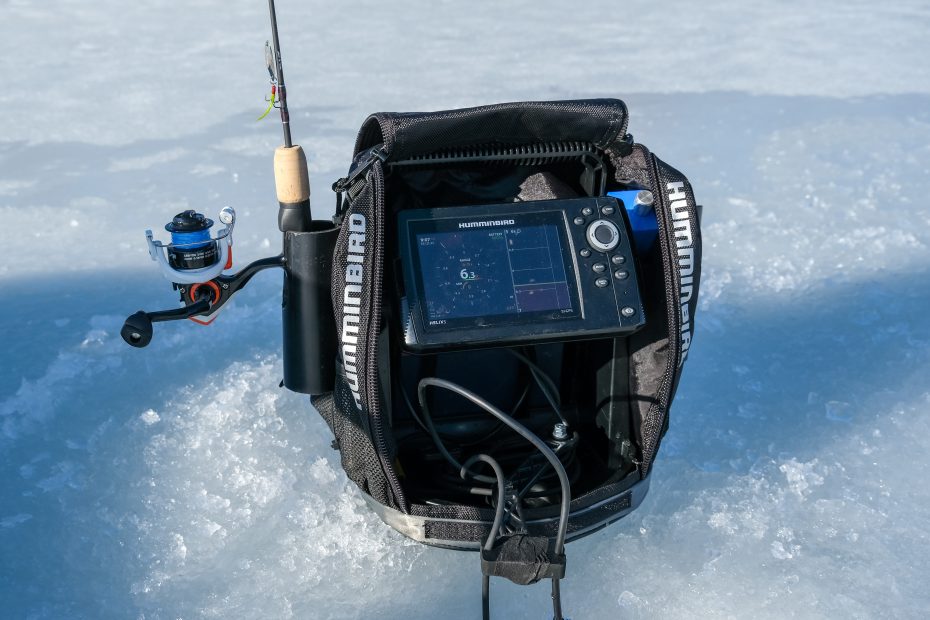
Like all traditional, and even most modern ice fishing finders, the Helix has a dedicated flasher mode. This display has a number of neat extras that you won’t see on other screens without digging though the menu settings. On the flasher display you can quickly see battery level, cone angle with bottom coverage and interference rejection settings.
The intent behind the circular flasher display is simple. It allows maximum water column resolution for a given screen size. For example, the Helix 5 vertical display size is 2.6″. In the above image, I’m fishing in 22 ft of water. The flasher (left) screen is displaying the 22 foot water column in a 2.5″ diameter display, which equals a 7.8″ circumference. The sonar (right) display is limited to 2.6″ of vertical water column. The advantage of having the water column spread out over more display area is that there are more pixels available to display smaller objects, meaning a finer resolution. Better resolution is exactly why I have my sonar (right) display zoomed in 6 times. In a zoomed view, I’m sacrificing the ability to see the upper 17ft of the water column to better see the bottom 6 feet and the small jig I’m fishing with.
Flasher mode is neat and has benefits but I find its circular display a bit confusing to read, especially when give a quick glance. So flasher mode is not how I use my Helix.
Sonar mode
I find sonar mode a far more useful and intuitive display to read. With sonar mode, you can see the water column in a more natural, vertical display. You are also able to see sonar history, so when you look away for a few seconds to grab a snack or change lures you don’t miss any action. Sonar history also teaches the user about their jig cadence and its much easier to see how fish react to certain presentations. A lot of reviewers will adamantly tell you to turn the sonar chart speed way up so that you can view the sonar in real time. I think this is a mistake because it clears your sonar history way too fast and is not utilizing the sonar to its full potential. Personally, I set my chart speed to around 3 or 4 out of 10. At these lower chart speeds, it takes 5-8 seconds to scroll though and clear the history, giving you plenty of time to look away and back without missing a cruising fish. Which is especially important when fishing for trout in shallow water. I know what you’re thinking, doesn’t a slower display also slow down how fast you can read your sonar? Not at all, and the answer lies within another Helix setting – Real Time Sonar window.
RTS (A-Scope) Window
RTS stands for Real Time Sonar and thats exactly what it is. The sonar signal is displayed as fast as the transducer is able to send and receive them. Even if you pause the sonar display to review something in detail, the RTS window will still be giving you live feedback. A-Scope is an additional feature of the RTS window which increases the width of the scope with the intensity of the sonar signal. The width, along with the varying display colour intensity is an indication of how strong the return signal is, or how close to the centre of the sonar beam the fish is.
The power of Chirp
The Humminbird Ice Helix flashers are one of the few ice fishing specific units that utilize CHIRP sonar. Chirp, which stands for Compressed High Intensity Radar Pulse, gives you clearer, high resolution images as well as increased target separation. Without going into too much technical detail, it basically means that the sonar transmits a spectrum of frequencies in a single pulse, as opposed to traditional sonar that transmits one frequency per pulse. The benefits of CHIRP sonar are improved detail, greater clarity, and best of all for ice fishing, much better target separation. Target separation of the Helix line is generally accepted as 3/4″ and I believe it. In the following image, I’m using a 1 inch tall Kastmaster spoon and the CHIRP sonar is able to clearly display the treble hook from the body of the spoon. The

Autochart Live – Now On Ice
New this season, Autochart Live is now available to use while ice fishing. I’ve only tried this feature a few times, as I have mapped most of my favorite spots during open water from the boat, but if you are fishing new water, Autochart Live makes quick work of deciphering underwater structure.
My Custom Ice helix Settings
I strongly urge you to convert your open water fish finder to an ice fishing flasher. I learn more about my fish finder in the winter than any other time of year and its mainly due to the fact that I have the opportunity to sit in one spot and experiment with different settings.
Here is a list of my Helix sonar settings. If a particular setting doesn’t appear, it’s likely stayed as whatever the default value is:
Software version 2.330
- Gain – set to 12 usually. My main target species are trout, walleye, pike and perch; therefore I never fish deeper than 35 ft. A gain of 12 is usually the perfect setting.
- Chirp IR off – Interference rejection is only needed when you are fishing close to another sonar. I’m usually fishing alone and away from the crowds so I tend to leave it off.
- Cone angle set to 15-21 to maximize CHIRP sonar – upper range 0ft
- Lower Range set to auto – some adjustment may be necessary because sometimes the sonar will vary the range as it hunts for bottom. On some sonar models, you can trick the sonar into transmitting more power by setting a deeper depth range and zooming in the section you’re interested in.
- Surface clutter set to 5 – default
- Flasher style – colour A scope
- Sonar Color – I use a black background, it uses less power but not as nice to look at in bright daylight.
- Switchfire – set to clear mode 99% of the time.
- Chart Speed – 3 or 4 usually. I find the fastest chart speed way too fast. With the combined power of A-scope it doesn’t need to be that fast. On chart speed of 3 it takes about 8 seconds to clear the screen. On 4, it’s about 5 seconds.
- Don’t forget to update your software! I usually check for new updates at the beginning of each season
https://www.humminbird.com/support/software-updates
The above settings are a great place to start if you just bought a brand new Ice Helix and you are not sure where to start. Don’t be afraid to play around with different settings either. As I tell my friends, if you haven’t had to reset to factory defaults, do you really know your fish finder? You always have a safe way out of trouble so go ahead and experiment!
battery Life
I started out using the standard sealed lead acid batteries but the run time was disappointing. I found it really tough to make it though a tournament day with one battery in the summer – nevermind when the cold reduces your capacity. This season I switched to a Dakota Lithium battery. The lithium iron battery provides me with crazy run time – I’ve fished for 2 full days on one charge, not caring at all about screen brightness and running the Ice Defense Pro on high before it went dead.
My flasher upgrades

If you purchased an Ice Helix kit, all you need to get started is a battery. If, like me, you are converting your summer Helix to winter use, you will the Humminbird conversion kit:
Humminbird Portable Ice Helix conversion kit for Helix 5/7
Humminbird Portable Ice Helix conversion kit for Helix 8 though 10
In addition to the conversion kit I also made the following changes:
- Marcum Transducer arm
- 2 Rod Holders – DIY 2″ PVC pipe zip tied to sides.
- Ice Defense Pro
- Dakota Lithium Battery 10 Ah
The transducer arm does away with that annoying foam float that tends to freeze to the side of the ice hole. In my set up, I hockey taped the rubber cord holder that the Ice Defense Pro ships with to the arm to hold both the Ice Defense pump and the transducer cord in one. This compact system has the benefit of making is really easy to hole hop – there is no need to gather up the transducer cord to make a move, simply pick the whole bag up and go. It is trickier, however, to pull the transducer cable when you have a fish on, I end up dragging the bag to the side with one hand as I fight the fish in the other.
TL;DR – Humminbirds Ice Helix is the best, buy one.
Obviously I’m kidding! The term “Best” is subjective at, wait for it, best… (I can’t stop myself). In all seriousness, the Helix 5 is a great unit and I’ve enjoyed using mine for years. I can honestly say I only have one complaint with it and that is the screen. Sometimes, if I hold my head the wrong way or view the screen from an angle, my polarized sunglasses will black it out . Since I wear polarized glasses all the time, it is annoying but I’ve learned to live with it. I do think the Helix is one the of the best ice fishing flashers you can buy for the money. There are a few other high end fish finders with flasher conversion kits that are catching up in terms of features, but nothing yet offers the complete package that Humminbird does. Even in 2021, there is no traditional rotary style flasher that offers CHIRP sonar.
Shop The Best Prices
Humminbird Ice Bundles


what battery type do you select for the helix if you have the dakota lithium in?
does it just show 100% battery life all the time when you have the lithium in?
Hi T. I have an older G2 Helix and the battery type is not selectable on mine. Now that I’m using a Dakota Lithium 10 aH the battery indicator stays at 100% until its near dead, then it will start dropping quickly. I’ve used it extensively in the summer and winter so I know I can get two days on the battery, I just charge it when I get home from the weekend. Thanks for the comment!
I would love to see close up pictures of your Rod holders!
It’s very simple! Just a short piece of 1.5″ PVC with a slot cut down one side and zip tied top and bottom to the outside of the bag.

Thank you very much, I was going to buy a new shuttle just so I can have Rod holders but I love this idea more.
Why would anyone get these clunky old ass Vexlars when Deeper make a product that is hands down superior to this one with Chirp technology as well. The deeper chirp 2 is portable, versatile and easy to use in water or on ice. Oh and it’s a 1/3 of the price.
Hahaha! Good comment, Kelly!
While they are old school and seem clunky, they do still get the job done. Deeper and the other wireless competitor products are cool tools that work well in open water but I have to disagree, they are not superior when it comes to ice fishing. There are three major problems that I see with castable sonars on the ice.
First, they operate off your phone and even the latest and greatest mobile phones can’t handle any amount of cold weather without draining the battery and slowing down performance. Ice sonars are designed to handle the cold, I never attempt to keep any part of my Humminbird, Lowrance or Vexilar warm while ice fishing and in my opinion, I shouldn’t have to.
Second, because the castable sonar floats at the top of the ice hole, if the ice is thick enough or you drilled your hole crooked or it isn’t perfectly centred in the hole, it suffers from noise and bad sonar returns. A proper ice transducer is on a cable and is lowered to below the level of the ice for the best reading possible. See this link from Deeper on ice fishing – https://deepersonar.com/us/en_us/manual/basics-for-ice-fishing
Lastly, I want my sonar screen in direct line of sight with my rod tip while I’m fishing, and unless you are putting it on the ice, this is impossible with a phone (see point #1). With my sonar screen directly behind the ice hole I don’t have to move my head or eyes back and forth and potentially miss bites. This may seem trivial, but being able to monitor your line, rod tip, and sonar screen near simultaneously can greatly increase your bite detection and hookset timing.
Prices can get out of hand but you don’t have to break the bank to get into the ice sonar game. I would personally recommend looking at the Lowrance All Season packs, specifically the Hook 4 and 5 series as great budget options. Garmin also has an excellent budget sonar in the Striker 4 series that is absolutely feature packed for the price (Chirp and GPS).
They also often go on sale at Cabelas.ca, CanadianTire.ca and other retailers.
I have a Lowrance Elite 7ti. I bought it to use in the boat and on the ice. Problem is that it’s a touch screen which works great in the summer. But in the winter the touch screen is fairly unresponsive unless I hold onto the negative battery post and then touch the screen to make any changes. I’m looking for a Helix Ice for next year.
Hi Neil! I am also a Lowrance user and have heard of this issue with the Gen2 touchscreens. Apparently the newer gen3 touchscreens do not have that problem and its not a problem I’ve experienced with my HDS Live. If you love your Lowrance, there’s two things you could do. I’ve heard that with the transducer in the water it should work like normal. I’ve also heard of people running a short length of wire from the negative terminal up to where they rest their hand on the unit, so you’re touching the negative terminal at the same time as the screen. Maybe this little hack will save you some time/money?
Ultimately, an upgrade to a newer model Lowrance or a switch to a Helix would fix it. I do like that I can use Autochart Live on the ice with a Helix.
What’s the blue box with the dial attached to the plastic frame?
Fyi… I use my makita 18V batteries to power my helix 5. Lightweight & easy to change out. I get 10+ hours on a 5ah battery.
Hi Will. The little blue box is an Ice Defence Pro, it helps keep your hole ice free during the colder temps and while fishing outside a shelter. Check out my review: https://www.stringtheoryangling.ca/cold-nation-outdoors-ice-defense-pro-review/
I hear that drill batteries can last quite a while but I haven’t tried it myself. It’s important to check the recommended voltage range of your sonar before hooking them up to higher voltage batteries but if it works, why not take advantage of what you already have! Thanks for the comment.
Hi Chris,
Thanks for the awesome write up! With both the Ice Helix 5 G3 and Garmin Striker Plus 4 currently on sale at Cabela’s, do you think it’s worth getting the ‘Bird or saving ~100 bucks and sticking with the Garmin?
Hi Connor, thanks for the comment! Thats a tough question, the Helix is a nice sonar unit but without GPS, it’s a little overpriced. In my opinion, the Garmin is the better value simply because it has GPS functionality. The ability to mark a hot spot and be able to come back to exactly that spot on your next trip is so helpful! One of my favourite uses of GPS to mark my favourite spots from the boat in the summer and come back in the winter and only have to drill 1 or 2 holes. Also, since the Garmin has a smaller screen the battery will last an incredibly long time on the ice. The Garmin does not come with a dedicated ice transducer but you are able to buy one for $120 CAD. You can also use the summer transducer it comes with and mount it to a DIY pole, plenty of good examples of that on YouTube! Hope this helps your decision!