
Affiliate Links: This post may contain affiliate links. Meaning I may get a small commission, at no cost to you, if you decide to make a purchase through my link. Please read my DISCLOSURE for more information.
Do you have a flipover ice shelter or a tonneau cover on your truck? Have you wanted to build a smitty sled but didn’t quite know how to do it? I love the smitty sled and it has changed the way I ice fish by making it so easy to haul my gear on foot. In my original smitty sled build, I outlined some history, benefits of the sled as well as how I built mine. For my new smitty sled, I want to tackle the problem of using a smitty with a flipover ice shelter.
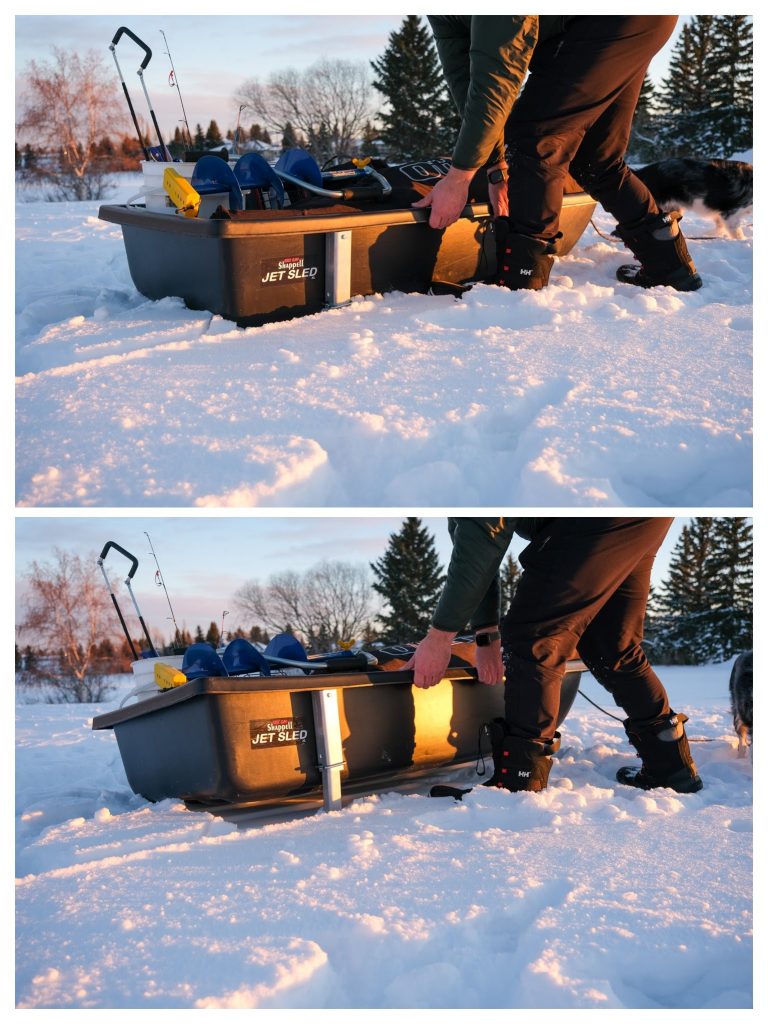
There are two problems with traditional smitty sleds that ice anglers often run into. The first is when used with a flipover ice shelter. A flipover shanty such as the Eskimo Eskape series or Clam Fish Traps are designed to be pulled around and set up with the tub of the shelter directly on the ice. By placing your shelter on top of a smitty, you are creating a gap underneath the skirting that allows wind into your shelter. The added height also raises the seating position and makes it uncomfortable for long stretches of ice fishing. Most who use a smitty sled with a flipover end up taking the shelter on and off the sled several times a day, which wastes precious time and energy that could be spent chasing fish!
Handy, DIY anglers looking to solve this problem often turn to heavy duty coffee table lift hinges to make their smitty sled drop down on the ice and to fit under their tonneau cover. These hinges are a convenient solution but have limitations as well. They are typically rated for a modest load, which is not enough for some gear-happy anglers (like myself). Also, the hinges are long and skinny and can often bend or break if a large enough side load is applied, such as when turning the sled in deep snow or sliding sideways down a hill.
The second problem is when using a smitty sled with a tonneau cover. Again, the added height of the smitty sled often means the setup won’t fit underneath a tonneau cover, and again, you end up disassembling and reassembling your setup just to transport it. What a waste of valuable fishing time!
Collapsible Smitty Sled


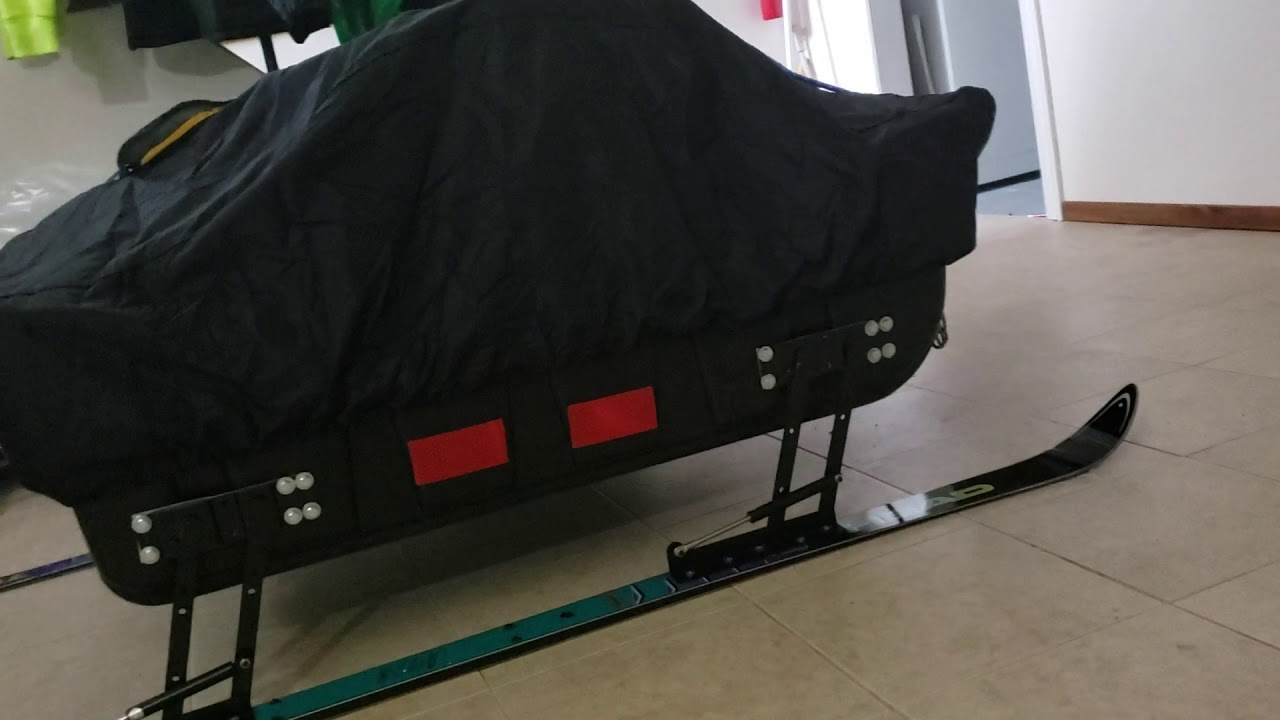
In my latest smitty sled build I will show you how I made telescopic legs and mounted them directly to the tub of my sled. This design is ideal for anglers wanting their smitty compact, easy to use, to fit underneath their tonneau cover and to use with flipover style shelters that keep the seat height original. This design is also something I was able to build at home with common tools. There is no welding or grinding, and if you can find a metal shop that has a band saw, there is no cutting as well! All you will have to do is measure and drill some holes.
Materials Needed:
- 4 pcs – 2″ Square Tube x 0.188″ wall with round corners – Cut to 8″ long
- 4 pcs – 1.5″ Square Tube x 0.065″ wall with round corners – Cut to 9″ long
- 8pcs – 1.5″ x 1.5″ Angle x 0.125″ thick – Cut 1.5″ wide
- 8 pcs – 1/4″ UNC Bolts x 2.5″ long
- 8 pcs – 1/4″ UNC Flat-head screws x 1.5″ long
- 4 pcs – 2″ Square U-Bolts
- 20 pcs – 1/4″ Washers
- 16 pcs – 1/4″ Nylon Locking Nuts
- 4 pcs – 3/8″ Double Button Snap Spring Clips (can also use 2″ wire-lock pins)
For this build I am starting with my Jet Sled XL. The height of the Jet Sled is 10 inches from the ground to underneath the lip of the sled. From my experience with my previous sled, I knew I wanted to have at least 4 inches of lift, so the 10″ of space is on the tub is the minimum I need to allow 3″ of engagement inside the tube for the spring button clips and to reach my requirement of 4″ of lift. I found that most of the time 4″ of clearance was enough to be well above the snow on the lake, but I may end up plowing some snow near the bank or on trails.

The bolt holes on the tubing are all drilled using a 1/4″ bit. Since the spring button is 3/8″ diameter I used a 3/8″ drill bit on the 1.5″ tubing. For the 2″ tubing however, I opened up the hole to 7/16″ diameter to allow the buttons to locate in the hole a bit easier when I raise the sled up. Due to the wall thickness of the 2″ tubing I also added a chamfer to the hole so my fingers would fit better when depressing the snap buttons.
The snap buttons were the most difficult item to locate for this build. I was able to track down a set through my local Grainger distributor, but if you are in the U.S. you might have to order from McMaster-Carr.

To secure the new telescopic legs to the sled I used a single quarter inch bolt at the top and a 2″ square tubing clamp to secure the bottom. The top bolt has two jobs, it secures the leg to the sled with a washer and nylok nut on the other side and it also acts as a stop for the inner tubing so that it doesn’t slide all the way through. Square tubing clamps are used to secure the bottom of the leg so the result is three holes in my jet sled.
Next, I flipped the sled upside down and marked the hole locations on the ski’s. The skis are the same length as my sled so I lined the back of the ski up with the back of the sled and marked my first hole. Once the hole was drilled out I used a screw to locate the hole on the angle bracket and placed the ski on top. I then repeated the process marking out my holes on the ski using the angle brackets as guides.

At first I was a little worried about the bolts pulling through the plastic tub since there were only three on each leg, but once everything was assembled I added all my gear (about 200 lbs worth) then I jumped on top (another 230 lbs) and started rocking everything side to side. In total there was well over 400 lbs in the sled and everything felt really solid. I was surprised that the base of the sled barely deformed with all that weight in it too. Of course, time will tell how everything holds up but right now I have full confidence in this design!

A drop-down smitty sled has long been in demand by the flipover crowd but it is also really useful for those anglers that want everything to fit neatly underneath their tonneau cover. I am very excited to share this idea with you all and hope that some of your take this build on yourself! One of the cornerstones of the smitty sled community is the ability to DIY, and I kept this in mind when creating these smitty sled plans. If you have any feedback or questions, please drop them in the comment section below, let’s keep the conversation going!
Benefits of my design
- Compact and easy to use
- Aluminum is really strong, able to handle over 400 lbs of load without the sled deforming or pins breaking
- No cross braces underneath the sled means its not impeded when the snow gets deep, the tub is still able to travel on top of the snow with assistance from the skis
- Simple design means anyone with common tools can build one at home
Drawbacks
- Aluminum is expensive and is cold on the hands in the winter
- Your sled needs to have a minimum of 10 inches of room under the flange lip to mount the legs to. Anything shorter and you will have less height to work with when raised up.
- I’m not certain the bolts connecting the legs to the plastic on the sled or the snap spring buttons would be robust enough to pull behind an ATV or snowmobile. At a minimum I would recommend using either fender washers or a backing plate on the inside of the tub as well as wire gate pins instead of the buttons for durability.
If you like this design please share it, and if you build one yourself or have ideas on how to improve it, leave a comment and share a picture!
Happy trails and tight lines anglers,
-Chris


Nice design, really like it. I agree about the long “dry” drag from truck to first snow/ice. After my daughters and now grandkids bike riding start ups days. I have several sets of bike training wheels. I made 4 , 2×6 quick disconnect sandwich blocks for each corner. Mounted 2 wheels onto each block. Throw on the skates. Load up the gear. Navigate across gravel, sand and rocks ( no concrete or asphalt here). Get to the ice edge, pop off the skates and start having a great day.
Thanks for checking out my article. Old training wheels are the perfect wheels for a smitty sled and a great way to give new life to old junk! Thanks for sharing your idea!
What type of aluminum did you use? I tried to call and get these parts but they asked what type of aluminum.
Hi Cory. I think you are asking about what grade I used, I used 6061 Aluminum, which is one of the most common grades of aluminum used for structural components.
I have researched and researched and I cannot find the aluminum tubing with the rounded corners. Can you please put me in the right direction?
Finding a metal shop that will sell small quantities can sometimes be the hardest part. I bought mine from a place called Metal Supermarkets, here is the link to their website: https://www.metalsupermarkets.com/product/aluminum-square-tube-6061/. Maybe something from this website will help give some clues?
Use a tiger paw on a grinder and round the corners if need be.
Great suggestion!
Mc master Carr
Part number (1471t962 ) and 1471t963
100 dollars each if you buy 6 ft you can build two sleds for 144 each
Thanks for the part numbers! I hope someone finds that handy.
I would love to see a picture of those wheels on. Almost got mine all ready
Hello Chris, couple of questions for you. You talked about double button latches ,how did you mount them to the inside leg?? And I noticed in your picture your risers were not on a pull over but a jet sled. I’ve got an Eskimo flip over, was wondering if the canvas will or won’t hang up when folding over to fish. This IS the best idea I’ve seen so far, I was thinking of making a metal smithy to set under the bottom but then( it would set under the flange of the sled) but then you’d have to take the sled off to get the smithy off. But I really like your idea and am going to try it thank you for your time and idea!!!
Hi Mike, thanks for the great comments and questions! I was on the same path you were, thinking I needed to build a sled to put my sled on. When this idea came to me I thought to myself “It couldn’t be this simple, could it?”. To answer your first question, the buttons are not actually mounted inside. The spring tension is enough to keep them in their holes during use.


While I originally mounted the legs on a Jet Sled, they were actually designed with the Eskimo Eskape 2600 in mind. Just a few weeks ago the Eskape went on sale in my area so I picked one up and mounted the Collapsible Smitty Sled!
The canvas doesn’t hang up at all. When I mounted the legs to the tub I left a roughly 3/8″ gap between the legs and the flange of the tub to allow the fabric and rubber strip to mount to the flange.
I also shimmed the bottom square U-bolt using a half inch thick flat bar so that the legs remained vertical.
There will be more info to come on a separate blog post about the Eskape 2600, but this is the short version.
Thanks for checking out the site, Mike!
Thanks for the post very informative keep me posted with any up dates
You got it! Thanks for the comment!
Do you have the materials that you used on the 2600 I’ve been struggling with pulling it around and I was going to use your idea for sure
Hi! Yes, about a third of the way down the post is a complete list of all the materials I used. If you do end up building one please share a picture and your experience! Thanks for the comment.
Only one question, how did you mount the ski’s to the (2) L brackets. Looks like bolts also, so did you counter sink heads in bottom of ski’s?
Hi Doug! Yes, they are 1/4 inch flat head screws that are countersunk into the bottom of the ski. Here is a picture of what they look like on my original smitty sled build:
I was interested in how you did it on your collapsible sled using bar stock and the two L brackets. You came up through the bottom but what type of head is on those botls?
I used the same bolts on both builds – they are 1/4-20 flat head machine screws.

Do you sell a kit,.minus the ski? If so I am interested in purchasing it. I have a two person flip over clam.
Hi! Unfortunately I haven’t developed a kit to sell yet. However, I have left all the instructions in the above article so I hope they are enough to help you build your own. I would be happy to answer any questions you have regarding the build process and welcome any feedback! The smitty sled skis make a world of difference when pulling a shelter around! I can’t believe I hadn’t built one sooner!
I am having a hard time locating the aluminum tube with the dimensions listed. Could you tell me where you got it? Thanks
Hi Joe! I bought the metal from a local Edmonton company called Metal Supermarkets. If you can find a small quantities metal supplier or hardware store near your location you could always try calling a few metal fab shops and see if they can sell you the lengths you need. They will buy the material in bulk and may sell you some small quantities. Send over a pic when you have your sled built! I love to see what people create!
Plan on building one for my son. If you leave 3/8 inch gap at top then both sizes of tubing would need to be 3/8 inch shorter?? Also on the 3/8 inch buttons, did you use the ones that fit 7/8 to 1 7/8 dia with 3 3/16 legs and 3/8 inch button H. or 1 to 1 7/8 dia. with 2 13/16 leg or 3 1/8 inch legs wirh button height of 7/16 inch. I’m looking on McMaster-Carr web site. Getting prices on alum tubing. Want to get everthing located and purchased before building. Thanks
If you are mounting the legs on an Eskimo 2600 like I have, the dimensions given should be correct. I have roughly a ½ inch gap at the top to accommodate the skirt rubber moulding. If you are mounting to something else, you are right, I would shorten it 3/8ths of an inch.
For the buttons, I would go with the taller 7/16″ button height. Because the tubing is so thick, I had to use a large diameter 1″ drill to countersink the hole so that I could depress the buttons deep enough with gloves on. I am not sure the leg length would make much of a difference to the buttons, I would go with whatever was cheaper or available.
Thanks for the comment!
Does the tubing have to have rounded edges?
I haven’t tried tubing with sharp corners. I went with rounded because I thought they would slide better during extension and retraction without binding up on the edges. I don’t know for sure that it would bind but experience tells me it was a high possibility. Let me know if you do try it and how it works! Thanks for the comment.
Chris,
I ordered the aluminum in the dimensions you specified, however by mistake the I ordered the 1.5 inch square tube with square rather than rounded corners. The square corner aluminum tube still works smoothly. My Eskimo 1 man flip over sled is 1” shallower than yours. In order to pickup 1/2” more of leg height I cut my aluminum angles to attach the skis to from 1.5”x1.5” angles to 1”x1.5”. While I didn’t order enough tubing to do this, one can also slot the top of the 1.5” square tube at their tops to slide around the top 1/4” bolt to provide even longer legs for greater snow clearance. Cutting the aluminum with a power miter saw with a blade designed to cut aluminum makes all the cuts easy and precise. Yours is the best Smitty sled design I have seen and I can’t wait to try it as many of my ice fishing spots are along walk.
Hi Bob, thanks for the great comment! Cutting down the angle on the ski is an easy way to gain a bit more travel – good one! I also like the saw blade designed to cut aluminum. While I don’t have an aluminum blade at home I use them often at work, you can even put one in your circular saw and cut just like wood. Glad to hear you like the design, I hope you get a ton of use from your flip now!
Chris,
Yesterday, I wrapped up construction and installation on my 1 man Eskimo flip over. While 1.5” square tube does telescope into the 2” rounded tubing and move smoothly as individual units, it does tend to bind once the skis are mounted. With some sanding to round the corners of the 1.5” tube, the action was much improved. I am sure you are aware it is also extremely important to make make sure the tubes are square to each other, even more so with 1.5” square tube. Rounded 1.5” tube is definitely the way to go.
Cross county skis are definitely lighter and thinner. My initial plan was to use cross country skis as I had older wooden skis that worked great on a previous Smitty sled. This time, due to the telescopic aluminum tubes, I decided not to. The design of cross country skis make them difficult to mount while keeping the tubes square to each other. Downhill skis are flatter with less variation in thickness allowing to keep the tube easier to keep square to each other. Downhill skis, while a bit heavier with more surface area, they much more durable.
Since every sled has different dimensions marketing conversion kits would be impractical. What would be nice if there was a source for the the overall lengths of aluminum in a “sled conversion pack” that was more affordable.
I enjoyed the project. Going fishing tomorrow.
You should sell kits!
I don’t have a lot of time on my hands. I’m a roadside diesel mechanic. In the Winter months it can get crazy busy for me. Summer months can get relatively busy due to fixing winters damages. So for guys like myself would appreciate being able to order and install. The best smitty design I’ve seen to date.
I would love to! The toughest part is trying to make kits for all the diverse flip over tubs on the market without getting your hands on them. Thanks for the comment, Shawn.
Hey Chris great idea, I know most won’t have this but instead of aluminum I had an old pop up canopy, you know the ones you are a lot at tailgating, so my idea is to just cut off the extendable posts at the height I need, everything is already there, we’ll see how it goes.
Hi Mike – That is a great idea! I actually had an old canopy just as you describe that I threw out this summer. I definitely should have tried using the legs for a smitty. Let me know how it goes! Thanks for the comment.
This is such a great article. Thanks for putting in the time to inform everyone.
Thanks for the great feedback, Blake!
Is your angle .125″ thick or .25″?
Your list says .125, but the pics look like .25
Thank you
Awesome idea
Good eye! I did use 0.25″ for the angle but its overkill. I just used it because I had it on hand.
Hi, thank you for sharing this wonderful build, the local Metal Supermarket actually has the supplies you mentioned!
Can you please share some thoughts and experience regarding “flexibility” and Smitty sleds?
I’m currently using the OG wooden build with the 2 cross bars, and due to either uneven terrain or pulling the sled in tight turns, the skis often camber to an angle making it hard to pull.
Thanks!!
Glad you found the supplies! I haven’t built the traditional smitty sled that collapses down, my wood sled is all screws and glue. I wouldn’t want too much flex like you said, if the skis aren’t parallel it will be really hard to pull!
thanks for the great video!! I am 76yrs old and have a hard time pulling my frabille cidell 2-man shack by myself. I think your collapsible sled would be a god sent for people like me who usually fish alone. please let me know if you would consider making a kit to sell as I will be first in line to purchase it. If one becomes availible please let me know.
Glad you enjoyed it! I am for sure considering making kits but I haven’t been able to dedicate the time to it lately. Keep an eye on the site and one day there may be a storefront. Thanks for the comment, Richard.
Chris, I measured the tube on my cidecal two man shack and its 7.5-8.0inches at mount areas along the sides. would that offer enough room under the tube and the ground? what length dose the tubing have to be, both 2.0 & 1.5 tubes?I have a sled coming tha I plan on making the same as your vidio, butt really hoping to do the two-man also.
Chris, I am collecting all the items listed for the collapsible sled/ice shack and going thru metal supermarkets and the 1.5 sq. tubing available is 1.5×1.5x.125 or 0.188 or.0250 not 0.065 wall thickness that you used, witch wall thickness would you use ? I can get the 2 inch sq. tubing with a 0.188 wall as you used.
Hi Richard. You can use whatever wall thicknesses are available to you to an extent, its not critical that they match my design perfectly. For the 1.5 square tube I would use the thinnest available, so 0.188 in. If you go too thick on the 1.5 then the double button snap springs won’t extend as far as needed to engage in the 2″ tube. To make pushing in the buttons on the double button snap springs easier I chamfered the outside of the holes on the 2″ tube with a 1″ drill bit. That made it easier to push the button in with my wider thumb instead of a finger. Ideally I would be able to find thinner 2″ tube and the buttons would work flawlessly but that isn’t as readily available – as you point out. Good luck on the build and thanks for the comment! I hope you will post a picture when you are finished!
I would love to by the hardware for this assembly. Please put some kits together and tell me the cost and I will pay you asap. Great invention. Mike Urban
Hi Mike! I’d love to be able to offer the kits in a hardware only version. Thats a good suggestion – I’ll look into it! Thanks for the comment.
Very cool! I’ll be doing this for my flip over. Are you using anything as a backer or support on the inside of the sled? Mind sharing a photo?
I’m glad you like it! I didn’t make any extra backing plate for the bolts on the inside, just the plate that came with the square U-bolt and the an oversized fender washer for the bolt at the top. Its been a year of heavy use and they are not any worse for wear. Thanks for the comment!
The demand is definately there… please consider making kits! I understand most sleds are different, but maybe make two different lengths, fitting 80% of the sleds. For the remaining 20%, they can either modify the kits or get a compatible sled.
I will be your first customer for two of them!
Thanks for the encouragement, Adam! Watch for kits to become available in the new year (2024). I’m working on the back end website stuff now.
Hey Chris! Love the design
Couple questions for ya,
Do the double button pins need to be a certain material for strength? ( I’m about to build my own and see these buttons holding up so much weight being a potential worry)
Have you tried hauling this behind a sled or atv? I’m considering adding a backing plate for mine as I will be hauling it. Not sure if it’s best to keep it raised or down behind a sled?
Did you get the website up for kits?
Hi Steffen! Glad you like the design. Yes, the double button pins need to be some type of metal. I haven’t tried anything other than metal button spring pins and the wired gate pins you commonly find on trailer hitches. As for hauling, I do tow the flipover behind a homemade tracksled but it only goes 25-30 km/h. The legs have been really robust though, I don’t have any hesitations with towing it faster if you know the trail. My biggest concern is getting a ski hung up under a root and tearing the ski’s out from the sled. When I tow behind the tracksled, there is a significant difference in top speed with the sled lowered vs raised up. I have much better acceleration and top speed with the skis in the extended position. I do have a quick update on the kits. I spent some time last winter updating the design and I’m just not happy with the current kit for what I would have to charge for it. I am working on updating the design before I offer them for sale. Thanks for the great comment!
I went to the metal supermarket close by to where I live and they basically refused to sell me the tubing in aluminum. Told me when aluminum rubs back and forth against each other it will seize up and I had no other option so I would some steel but it’s quite heavy, good thing it’s not a lot of metal
Hi Taylor! I am surprised to hear they wouldn’t sell you what you asked for. While they are technically right, the aluminum would gall under heavy load and friction, that would only happen if they were sliding against each other while under load. Additionally, the clearances between the two pieces of tubing are so great that they are not rubbing together with any force while lifting up and down. Hopefully you can make the steel work for your needs, I’ve used the aluminum for a few years at this point and have had no issues. The legs work as well now as they did when I first built them. Thanks for the great comment!
Hey Chris, thanks for this great idea, I’m starting my build soon. From what I can tell, all the weight of everything you put in the sled, is being held up solely by the pins inside the tube? That’s interesting to me that those spring pins would hold all that no problem! I was thinking about using a quick release pin on each leg instead. But then I would have to line up the holes on each leg everything I extend it. So I want to use the spring pins you uses… I’m just leary 😅 Any insight?
It’s true, the spring pins support the entire weight of sled and everything in it but the pins are plenty strong! I’ve had my smitty loaded up with over 120 lbs of gear, then I’ve jumped on top (230lbs) and rode the whole thing down a hill. I also tow my smitty behind a tracksled, that’s where my kid rides, without any issue. And this is for the last few seasons. So the pins and legs have plenty of miles on them and so far no problems. Thanks for the comment!
That’s great to hear! I started building tonight and the rest of my supplies should be here by Thursday. I’m extending the 2″ tubing slightly above the lip of the sled and then going to make cross bars that go over the top of the sled about 10″ high. And I’ll use those to mount my auger! I’m curious to hear what updates you’ve made to yours since your initial build
Hi Greg, its great to hear you are building one! I haven’t made any updates to my original design but I do have some concepts for a commercial version. I like the idea for adding an auger rack, thats something I’d like to incorporate as well. Be sure to share a photo when its all done! Thanks for the comment!
Where can these bought?,im in manitoba, Canada
Hey Ed. You should be able to buy all the parts you need through a metal supplier and parts distributors like Acklands. I haven’t developed a kit to sell at this point in time. Thanks for the comment!
What if you spray and rub off some wd specialist silicone spray on the inner aluminum square metal to help prevent binding and possible freezing if it get wet?
Thats a good suggestion, Mark. I do have some white silicon grease inside my tubes but its hard to say how much it helps. It definitely doesn’t freeze up there though! Thanks for the comment!
Hey Chris,
Ordering from metal supermarkets.com and I can’t find 1.5″ Square Tube x 0.065″ wall with round corners, could you provide an alternative?
Thanks,
Mark
Hi Mark. A few people have used steel, and others have tried galvanized steel tube with perforated holes. The biggest thing to be aware of is maintaining the gap between the inner and outer legs so there is no binding. Good luck on the build!
Hey Chris I’m using the legs
off my old boat dock flats on bottom welded to 3/4 inch aluminum round aluminum which fits inside 1 1/4 round which I will attach to sides of my eskimo sierra.should work I will take my cross country skis off my sled and use those.yours is the best idea I’ve seen so far.Thanks
Hi Tim. That sounds like a great solution, I’d love to see a picture when you’re finished building it! Thanks for the kind words and comment.
Hey Chris. Not sure if you still monitor this article but if you do i have a question. I built your system for my Otter sled and it worked great. The one big issue i have is when I lift it into the truck. The tubes fall out if you dont have them extended and locked. Any thoughts on how to fix? Its an excellent system. My sled is pretty heavy even without anything in it. Im playing around with electric lifts to extend and retract. Haven’t figured it out yet…just in the thought stage.
Hey Andy! This page is still alive and well and I appreciate that you left a comment!
I know what you mean. When I two-person lift the sled into the truck then typically the skis will extend and lock at the buttons again. I haven’t had them fall out all the way. I guess those that use the gated pin instead of spring buttons wouldn’t have this problem. How I’ve been getting around the issue is I use some 2×6 ramps to load and unload the smitty from my truck and I space the ramps so the skis are supported.
I’ve thought about electric actuators too but I haven’t dedicated the time to sourcing the parts. If you did a lot of moves in a day the electric might be the way to go but the buttons have been so easy that I haven’t found the need.
Thanks for the great comment!
Hey Chris, I’m preparing to start putting this together on my sled. How did you mount the skis to the angle? I assume without countersinking of some sort the bolts would scrape on the ice and cause friction? But also countersinking might take away majority of the material of the ski…What was your solution to this?
Hi Noah, its great to hear you are starting your build! We have so much flood water in our area that a smitty is a must have this ice season. You are right, the skis are mounted with countersunk bolts. The countersink is only deep enough to penetrate the plastic on the bottom of the ski, it doesnt go into the core so that the strength of the ski is preserved. Some do not like that the screw head is still exposed on the bottom and I have seen a few people fill the screw head in with ski wax. Personally I have never waxed my skis but I also try not to pull across gravel or pavement when it can be helped. Thanks for the comment and I hope this is helpful!
Hey Chris,
I ordered a lot of the parts of this build tonight for my Otter Pro Lodge X-Over. I love that fish house, but it was the first shack I bought, and I didn’t really think about how detrimental the weight would be when hand pulling it. It’s almost impossible, especially in deeper snow with a tub full of gear.
I was unable to locate one of the sets of aluminum tubes with rounded corners, so I got square instead (specifically the 4 piece 1.5” tubes; I was able to find rounded corners for the 2” 4 piece set). Will that be a deal breaker?
Also, in an earlier link to McMaster, it brings you to something like four sets of double buttons. Which ones do you recommended? I wasn’t sure so I just bought, uh, all of them.
Wish me luck. This is way more of a DIY project than I have ever attempted.
Thanks, Nick
Hey Nick! Your story is the same as mine! My first flipover wasn’t even insulated and after dragging it through the snow for a season I quickly sold it. Way too heavy for everyday use.
Hopefully you wont have any issue with the sharp corners on the square tube. If you have any issues I’d start with filing them down.
Good luck on your build!
Hey Chris,
I’m about to start my build. Could you post more specifically about which double button 3” spring clips I should buy from McMaster-Carr? Thanks!
Hi Nick. I followed my own link to the McMaster Carr site to try and help. I believe the ones I use are the largest size of opposite size double buttons in the zinc plating. Screenshot below to help:

Chris,
Could you elaborate a bit more on how the buttons go inside the tubes? Are the holes in both set of tubes for the buttons to push through?
Thanks!
Ya know what…I figured it out! Just gotta attach the legs to the sled and the skis to the legs. Cheers, Chris!
Mission accomplished! It’s all put together!
I believe tomorrow will be test day out on the ice.
Great to hear, Nick! Good luck and tight lines man!
Hey Chris,
This is an awesome build that will fit my needs perfectly. Did you ever come up with kits for this? Guessing not as I don’t see them on this site. I’ve been through all the comments, I’m wondering if at the least you have some links as to where to purchase (the legs specifically) I’m in a little podunk town with minimal options.
That said, I did find a local metal shop that has square (not rounded) 2” and 1.5” tubing, however, the inner diameters on each are not quite what your kit calls for (seems to be a little loose in there, is that alright?)
Appreciate you sharing your build,
Hi Greg. Sorry, I did not put together a kit for this. With shipping and tariffs affecting prices, I would have to charge an arm and a leg to make it worth while! I’ve always liked ordering from McMaster Carr. If you are in Canada, Acklands Grainger might be able to supply what you need. Good luck and thanks for the comment!