Affiliate Links: This post may contain affiliate links. Meaning I may get a small commission, at no cost to you, if you decide to make a purchase through my link. Please read my DISCLOSURE for more information.
Last weekend I had the exciting opportunity to try to transport my large fishing kayak, the Bigwater 132 PDL, on the roof of my truck sans roof rack. After spending the morning exploring some mountain waters, quite far from home, I began to load up my kayak using the same rack system I’ve had for years – the Thule Hullavator and Rhino Rack Vortex bars. I loaded the kayak into my extended Hullavators and tied it down tight. As I lifted the kayak up and locked the Hullavators into place, my Rhino Rack suddenly buckled under the weight and I was quickly forced to find an alternate way to get my kayak home.

I’ve had the Rhino Rack Vortex bars on the roof of my truck for at least four, maybe five, years. I do take them off in the winter and put them into storage but they spend the summer on the roof of my truck. Up until now, I have never had a problem.
So without a rack, how do I get this big kayak home? Being somewhere remote means I could only use whats around me and in a normal situation I would be struggling. Luckily for me I was with a large group of kayakers and by asking around to a few new friends I was able to gather everything I needed to secure the kayak, mainly straps and some foam blocks.
Step 1 – loading the kayak on the roof:

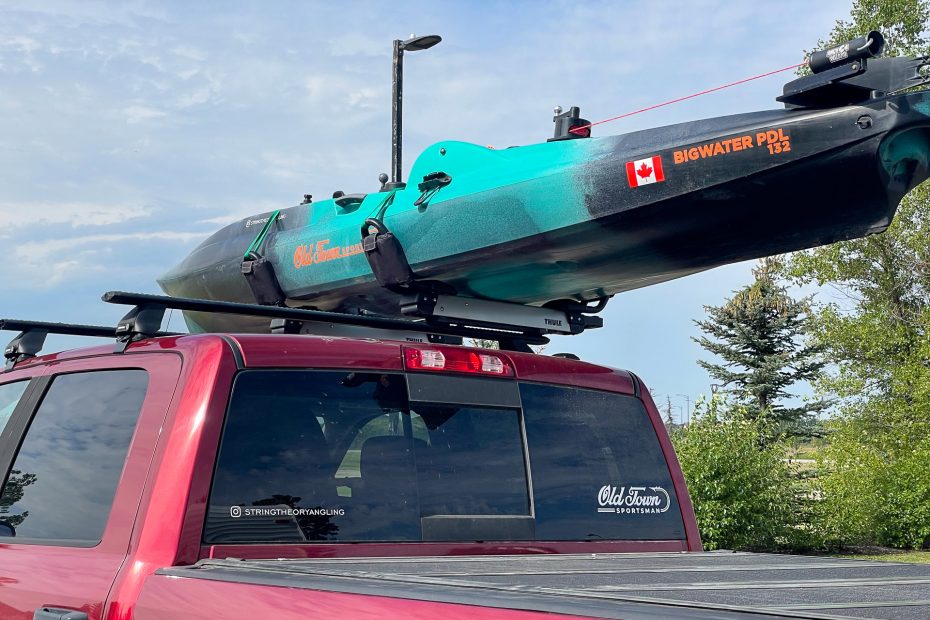
Getting a nearly 100 lb kayak on top of a 7 foot tall truck without damaging your paint is nearly impossible, even with helping hands. In this case I was able to put down some towels and slide the kayak up without much trouble but my paint has definitely suffered.

With the kayak on the roof I was then able to slide some foam blocks underneath to support it. This is probably the trickiest part as many vehicle roofs are not designed to carry any load and the light gauge sheet metal on your roof will probably end up buckling under the weight, as pictured above. The trick here is to place the foam blocks where the sheet metal has a bend because the bend adds stiffness. In my scenario, I placed the rear block as close as I could to the back of the cab and there was nearly zero bend in the metal. The front block was trickier due to the clearance lights on my roof. Ideally, I would have placed the block right at the windshield for the most strength but since the lights were in the way I ended up placing it just behind, resulting in the big dent. Fortunately, this dent popped out as soon as I took the kayak off but that could have easily been permanent.
Adding more blocks to spread the weight out is tempting but its important that only two blocks are used. Two blocks spreads the weight evenly front to back. Adding a third or more blocks will result in uneven weight distribution and cause the kayak to rock back and forth while driving, or worse, the block might fly out on the highway.
Step 2 – Strap It Down

NRS cam buckle straps are the gold standard for strapping down canoes and kayaks. NRS straps are thick, durable and have really good bite so they don’t slip. In this case, I ran the strap in a continuous loop through the open doors of my truck and synched the strap down tight. Theres no need to tighten like crazy – as long as the kayak is centred on the roof and the strap tension is checked periodically while you drive, you shouldn’t have any surprises. If you end up using ratchet straps, be sure not to over tighten as you can damage your kayak and/or roof very easily.

Pro-Tip: Adding a few twists to your straps, as pictured above, will prevent the straps from vibrating in the wind.
Step 3 – Bow/Stern Tie Downs

Tying down the bow and stern of your kayak is an important safety step but its also not always practical due to how your vehicle is shaped. If tying down both ends isn’t possible, the most important end is the bow, or front of the kayak. Fortunately, my truck has tow hooks that I can tie the front of the kayak to but I don’t have any way of securing the rear, so I left it out. When tying the bow down, its important that you secure it from not only lifting up from the wind but also from wiggling left and right. Any side to side movement caused by crosswinds on the highway can loosen your straps and cause damage to your vehicle. Since my kayak has a large handle on the front I was able to run the rope through a loop to prevent it from slipping and cinch down each leg of the rope individually using a truckers hitch. I always keep a long length of rope in my truck because you never know when you will need it!
Load Ratings
Load ratings are very important and its also very important to remember that your roof rack is only good as the weakest component in your system. In my setup, the Rhino Rack Vortex system is only rated to carry 165 lbs, total. Due to the age of my Rhino Rack system, my weight rating is 75 kg/165 lbs. Newer racks may be rated to carry more weight.
Total Weights
- Bigwater 132 PDL (Fitted Hull Weight w/o PDL or Seat) = 95 lbs
- Thule Hullavator (set) = 38.5 lbs
- Total = 133.5 lbs
As you can see, my setup is within the rated load capacity but not by much. If I were driving off road, the weight capacity of my roof rack could be reduced by as much as 50%! Check you specific rack manufacturer to be sure.
Thule Hullavator
If you are familiar with the Thule Hullavator, keen observers will have noticed that my fishing kayak is quite a bit heavier the recommended weight rating of 77 lbs of the Hullavator system. This is a risk I take for the convenience of using the Hullavator. In my opinion, there is no better loading assist device on the market for large fishing kayaks than the Hullavator and without it I don’t think I could regularly load my Bigwater onto the roof of my 7 foot tall truck without damaging both my truck and my kayak.
Conclusion
Although its possible to transport your heavy fishing kayak on a bare roof, I don’t recommend it. Proper planning and having the right tools goes a long way and it is definitely possible to do once in a while but its not a long term solution. In my case, I was very lucky on many fronts – I had friends around with extra straps and foam blocks as well as lending a hand loading the kayak on the roof without too many scratches. I also benefit from experience, I knew how to tie knots and know the safest way to transport a kayak on a bare roof. If any one of those stars weren’t aligned getting my kayak home would have been much, much harder. In the future, especially on long trips, I plan on carrying foam, straps and extra rope just in case. If not to help myself, I may be able to help someone else in need.