
Affiliate Links: This post may contain affiliate links. Meaning I may get a small commission, at no cost to you, if you decide to make a purchase through my link. Please read my DISCLOSURE for more information.
I mounted my Humminbird Helix 5 SI on the Bigwater PDL 132 as soon as the kayak came in, but I wasn’t 100% satisfied with how it was installed. There were just some small details that I thought needed some improvement. After experimenting with the fish finder and transducer locations and trying out different mounting options, I feel like now I have the perfect setup. Read on to see what improvements I made!
Transducer Mounting:

Most of the new Sportsman series kayaks come with a universal transducer mounting plate. While that plate makes it easy to mount almost any fish finder transducer, its not perfect for my Humminbird XNT 9 SI 180 T transducer and included transom mount.

As you can see in the images above, I mounted the transducer as far into the recess as possible. When viewed from the side, this offers the transducer a lot of protection, but the hull interferes with the side imaging signal. You can tell when there is interference from the hull when your side imaging returns look like the following:

What should look like a flat mud bottom shows artificial “waves” starting from under the kayak and moving out towards the sides. The edges of the signal, at 100′, are also quite weak. These are clear signs that your transducer does not have a clear view to the left and right of your boat. In my case, the edges of the hull are causing interference.
On my second try, I moved the transom mount down to allow a clear view for the transducer. This cleaned up my signal, but now the transom bracket was sticking out from the hull. It works, but its not a very clean looking installation:

I know I’m not alone when I say that there must be a better mount. Enter Navarre Kayak Fishing. Nick, over at NKF, has been using the Bigwater/Predator PDL kayaks for years and has put an insane amount of seat time in these boats. In his quest for improvement, he’s designed some simple but elegant solutions for these kayaks.
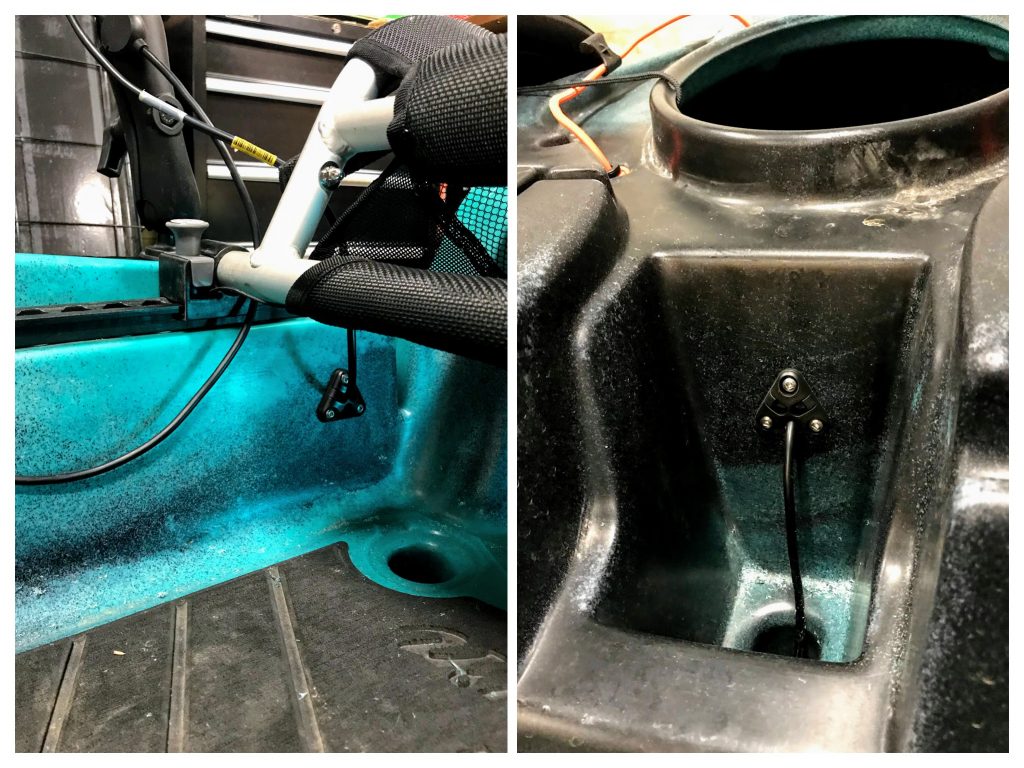
The mount he designed is a 3D printed bracket and was made specifically for the Humminbird/Garmin transducers. His one bracket replaces both the Humminbird Transom mount and the Universal Mounting Plate. It also has the added benefit of tucking the transducer closer to the front and providing a bit more protection from getting caught on weeds or when beaching the kayak.


Wiring:
Next on my list was cleaning up the wiring. I initially ran the wires through the scupper and into the front hatch until I had a feel for how I wanted things mounted. Again, it works, but we can do better!

This year, Old Town designed and built some wiring glands that were used on the new AutoPilot series of kayaks. I know a lot of people have been using the Wilderness systems and Hobie wiring glands but I thought, since its an Old Town kayak, I should see if I can get their glands. So, I called the factory up and had some shipped over to use on my Bigwater.
If you’d like to order the glands for your boat, you have to call Old Town directly and place your order. To make things simple, the part numbers are as follows:
- Thru Hull Wiring Base – 01.1315.1001
- Thru Hull Base Gasket – Item #: 01.1315.1003
- Thru Hull Sealing Foam – Item #: 01.1315.1004
- Thru Hull Blank Cap – Item #: 01.1315.1005
- Thru Hull Wiring 3 Hole Cap – Item #: 01.1315.1002

Mounting the Head Unit
As I was browsing the Navarre Kayak Fishing Shop, I came across his 3D printed handle replacement. The replacement handle allows you to mount a T-slot bolt and then put accessories right next to you. I thought this was the perfect place to mount my Helix, and installation was super easy. In Nick’s videos, he uses the Ram Mount and is then able to swivel it out of the way, very handy indeed!

The more time I spend in the Bigwater PDL 132, the more I appreciate the little improvements. I can see why people like Nick, who spend countless hours in their kayak, dream up such cool improvements. I also appreciate when anglers make those improvements available to the masses, whether that’s though sharing ideas and pictures on forums or making those inventions available through a store. Your contributions to the community benefit everyone! Thanks!
If you’re interested browsing the other accessories offered by Nick at Navarre Kayak Fishing, check out his store here.
Shop the Best Prices
Humminbird Helix 5 SI
Cabelas.ca | CanadianTire.ca | BassPro.com
Old Town Sportsman Kayaks

Hey Hey Chris, appreciate your writeup. I have a Topwater PDL and been thinking about getting a Helix 5 or 7 with Side Imaging, so was a nice article to come across! The issue you brought up with some hull interference in SI using the universal mount was exact concern I have. Did the mount from NKF alleviate the issue with the hull interference you were having?
And to just get your opinion as I was thinking of the Helix 7 to get the MEGA imaging. Any issue in your opinion of having a larger Helix on the PDL, especially while pedaling? I think its maybe 3” wider.
Thanks
Hi Jeff, glad you enjoyed the article! Yes, the NKF mount completely solved the hull interference issues I was having. I don’t think everyone has that issue though, I was attempting to tuck the transducer up as far as possible but if you are not concerned with damage you should be able to mount it lower in the water with the standard mount. I would love to upgrade to Mega Imaging and would definitely run a 7″ screen. The 5″ Helix performs fine – I can see rocks, weed lines and even larger fish, but Mega Imaging will be much clearer.
Thanks for doing the legwork here. NFK was a great find. Was kind of freaking out AFTER I bought a Garmin Striker 7sv. They had an improved transducer mount for the Garmin and was able to pick up some extra stuff they came out with for the PDL kayaks.
No problem! Im glad you found my post valuable. I think its great that NKF is coming up with solutions for us, there are so many transducer types and sizes that if it wasn’t for people like him we would be stuck trying to make things work on our own.
Great article and pics Chris…thanks for the info! I am thinking of getting a Lowrance Hook 7 Reveal Triple Shot with side scan for my Old Town Bigwater PDL 132. Was wondering if Nick’s bracket from NKF would work for that model as well? The transducer is also quite a bit longer than the Helix 5. Has anyone heard anything on the Hook 7 Reveal Triple Shot and Old Town 132?
Thanks for the comment, Ken! The Tripleshot transducer is pretty large but I haven’t heard any negative reviews of the the NKF brackets. In fact, I do remember seeing a video with the tripleshot installed using the NKF bracket here: https://www.youtube.com/watch?v=Zed9XaeZFEQ
Hope it helps!